LEARNERS TOGETHER
  • Reflections
  • Presentations
  • About
  • For Families

SCHOOLOGY TIPS AND TRICKS

Reduced grading time is spelled R-U-B-R-I-C-S

Schoology rubrics are by far one of my favorite tools.

Let's start with the obvious--I cannot even begin to count the hours I've saved by opening assignments on my iPad, tapping rubric boxes and typing a bit of narrative feedback. This is especially true in my Speech class, where I need to assess student presentations on the spot.

And even better, Schoology rubrics are highly flexible and super easy to set up. You can decide everything--from the number and type of criteria to point values to textual indicators. The only thing limitation is that categories must have numbers attached. (Hopefully Schoology will offer non-numeric options in the future!)

So if you try nothing else this year--try the rubric. You will thank me!
Picture
A rubric I created for an Ignite speech in my Speech class.

The Schoology tool I can't wait to try: Portfolios!

Schoology's updated features for the 2015-16 school year include a brand new portfolio option that I can't wait to try. During inservice I had the opportunity to work one-on-one with one of the social science teachers in my building to explore the possibilities. While we have not yet had the chance to test it on a real-world assignment, we came up with a great list of options:

--Making it the location for a senior project portfolio
--Creating art portfolios that can be shared with the school
--Research project portfolios for a social science class
--Freshman, sophomore, junior, and senior collections of favorite work completed each year (used to demonstrate growth over the four years of high school)
--Teacher end-of-the-year portfolios highlighting professional work completed, favorite lessons and activities, survey results, commendations, and reflections.

To see a sample portfolio in progress that contains material I create as part of the SMA Tech Department, click HERE.

How to efficiently use the Workload Planning tool on Schoology

As I mentioned in the faculty meeting on April 13, the Workflow tool on Schoology can be a great way for teachers to gather information about the overall workload of their students. So here are a few quick tips on how to make it most effective.

1) Where is the Workflow Planning tool? (Ex. 1 to the right).
Currently it is only available on the web version of Schoology--NOT on the app. You can find it in the menu on the left side of the screen when you are inside one of your classes.

2) What will show up on the Workflow Planning tool? 
Items that are graded on Schoology--assignments, quizzes, graded discussions. Calendar events will NOT show up. 

3) What if I have an assignment that is not turned in on Schoology? (Ex. 2 to the right).
Make an assignment for it on Schoology anyway. Even better, include the instructions and FAQs the students might need so they don't lose them. You can fix the assignment so it will not accept online submissions (and I encourage you to clearly state in the instructions or title that it is for IN-CLASS SUBMISSION ONLY.)

4) What information can I gain from looking at Workflow Planning? (Ex. 3 to the right.)
  • The number of Schoology graded assignments/quizzes/discussions that each student in your class has due on any given day.
  • When you click on a box for a given student, you will get a list of the items due on that day, which classes they are in, and which teachers created them.
Picture
Ex. 1: A view of the Workflow Planning tool.
Picture
Ex. 2: How to disable submissions on an assignment on Schoology.
Picture
Ex. 3: What the assignment list looks like for an individual student in the Workflow Planning tool.
5) What could I do with that information?
It will be up to us as teachers to use our best judgment based on what the tool can tell us, and use that data as a stepping-off point for gathering more data when needed. For instance, I could use the following procedure:
  1. Look more closely at days that I plan to schedule deadlines for a larger test, project, or paper. 
  2. If one or more of my students have lots of assignments due that day, look more closely at the list of assignments. 
  3. If I can’t tell how weighty those assignments might be or if I think my students might be overwhelmed, check in with the teachers who created the assignments to learn more.
  4. Based on the information I gather, I might decide to reschedule my test/project OR I might give my students some options to choose from about scheduling.
(NOTE—just by giving students some options to choose from, we can reduce their stress, even if the option they choose is to have our assignments remain on the dates they are scheduled. And we also show them that we are collaborating on their behalf.)

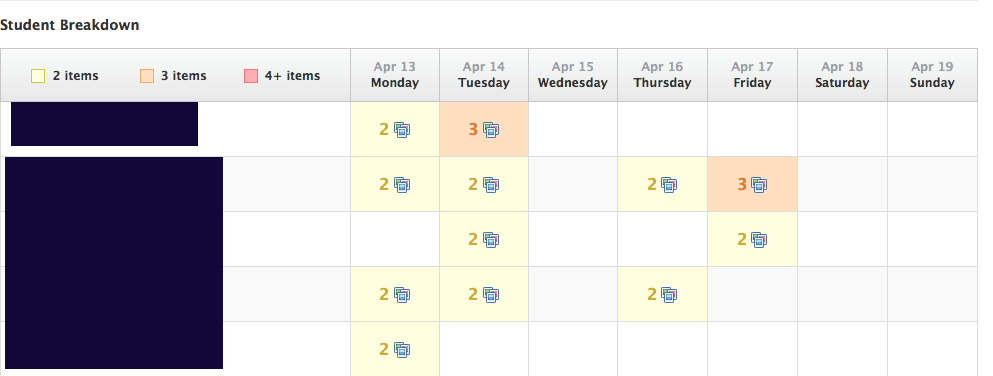
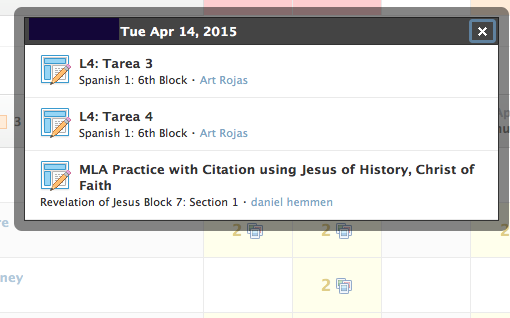
6) Do we have a consistent format for assignment titles?
Not at this point. But based on feedback from teachers, I encourage you to follow this format. SUBJ.TYPE: Title. Some examples:
  • MTH.HW: Problems 2-4
  • SPAN.In-class: Unit 2 Skit
  • ENG.Paper: Poetry Essay Final Draft
  • THEO.Test: Women of Genesis Unit Test
  • SS.Project: Immigration Suitcase

Schoology 2.0 Training: April 2015

Time-Saver Tips for Creating Quizzes
1) Use the web version of Schoology to make quizzes--the app does not allow for that function.
2) Make sure the point totals for all your questions are the same as the point total you originally set up.
3) Your Settings Tab inside the quiz is your friend. 
  --Make your quiz "Available" when it's time for students to take it. 
  --Decide how many attempts you want students to have.
  --Randomize the order of the questions for greater security.
  --Set "Question Review" to yes.
  --If you have multiple classes taking the quiz, set "View Submissions" to no. You can reset it later so your students can review their quizzes.
4) Important--know that if you set "Resumable" to no, then plan to be troubleshooting a bit during the quiz. Someone will get bumped off--it's just the nature of the program. But it's easy to fix and a great opportunity to model problem-solving with your students!

Tips for Grading Quizzes:
1) Go to the Results tab and click "View by Question". 
2) Check the stats under each question to check for any problem questions.
3) Click on any open-ended questions to view all student answers on one page.
 
Time-Saver Tips for Rubrics
1) Have a plan before you start.
2) Keep the text explanations on criteria and levels to a minimum.
3) Add a criteria level for on-time submissions if you accept late work.
4) You can either create the rubric in your Gradebook menu, or you can create it when you create the assignment.
5) You can copy a rubric over to other courses by using the gear icon next to it in the Gradebook menu.


Time-Saver Tips for Grading Assignments in the App
1) For annotating, click the pen at the top right when looking at a student submission.
2) Use the handwriting function for circling or drawing larger symbols/arrows/lines. Use the post-it note for more detailed typed comments.
3) Make sure you click the green check mark to save your annotations!
4) Add a rubric for easy grading--tap the boxes and add a bit of typed commentary, and you are done! This is particularly useful for presentations and speeches.
5) You can leave audio or video feedback by clicking on the Comment box when looking at a student submission (looks like a speech bubble at the top right of the screen), then clicking the plus button for options.

Updating Grading Periods on Schoology

As the new semester begins, don't forget to check and/or update the grading periods on your Schoology course pages. If you have not set the course to continue into second semester, it will automatically archive. 

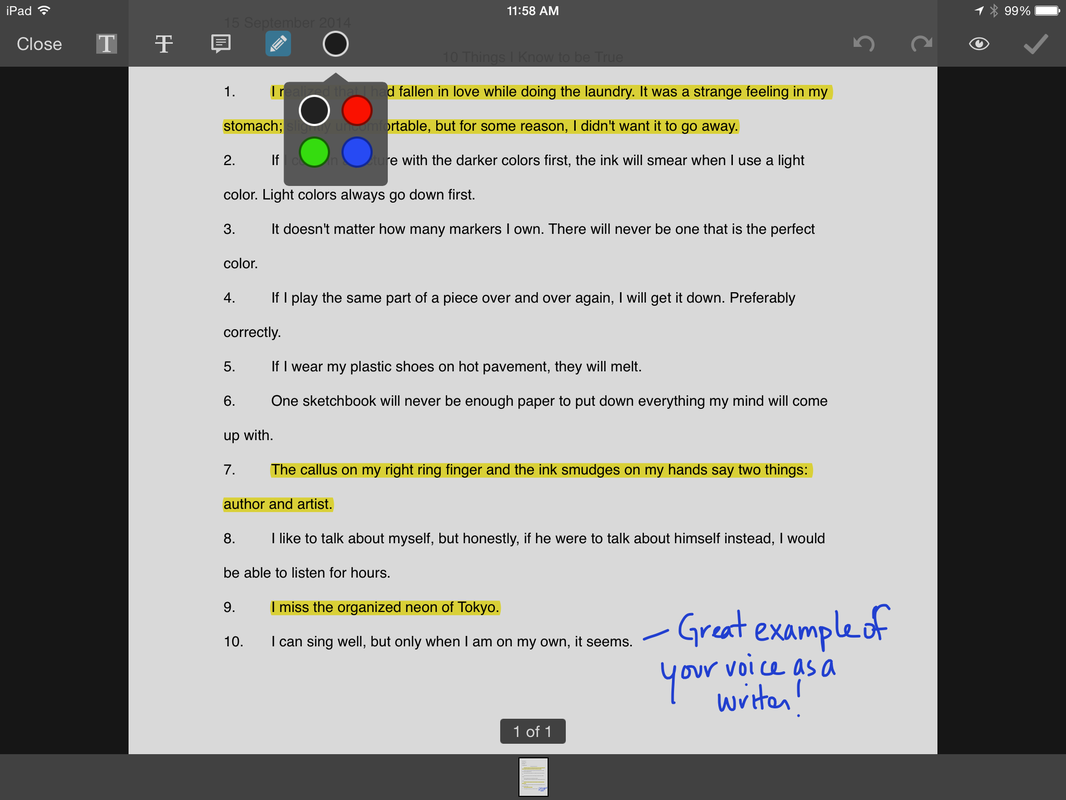
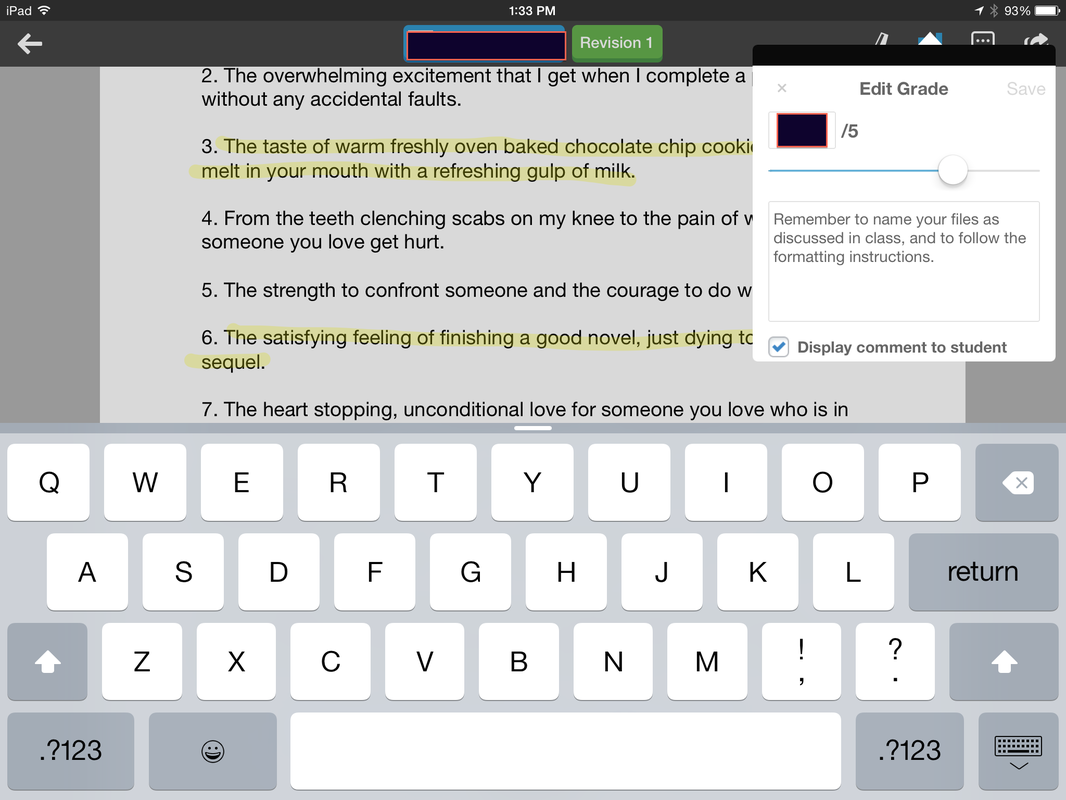
Here's how:
1) Open the course page. Go to Gradebook>Grade Setup in the left-side menu.
2) Under Grading Periods and Final Weights, click "Edit".
3) Make sure that Sem2 2014-15 is checked in the dropdown menu.

You are all set! (And if you forget and need to find out how to retrieve archived courses, scroll down to the bottom of this page for the instructions.)

Happy Second Semester!

In-App Annotations on Schoology

YES! It's finally here! You can now write on student work directly in the Schoology iPad app.  It's AWESOME!
Click HERE for the Schoology Tutorial on how this works.
Picture
Picture

The Turnitin App on Schoology

Yep, we've finally got the two hooked together. For a brief overview of how it works, see the video below. 

Schoology Best Practices 

We've crunched the data and feedback from students and faculty over the summer, and some common trends definitely floated to the surface. One of them relates to how we as teachers use Schoology with our classes. Students were overwhelmingly positive about Schoology as a tool, but offered some great feedback about how it has been more or less helpful for them. Based on that feedback, we encourage everyone to focus on the following best practices this year. 
  • Create and use a Schoology page for each of your classes. 
Why? When all of a student's teachers use Schoology consistently, the student is far more likely to stay organized, and her parents are much more able to help her do so. This is particularly true for our freshmen and sophomores, but highly requested by our older students too.
  • Post key dates (tests/quizzes, paper deadlines, project due dates) on the Schoology calendar for each of your classes.
Why? If all of a student's teachers do this, the student's Schoology calendar will automatically show all key dates for ALL of her classes. This becomes a fabulous organization tool for both the student and the adults who help her. Check out the PPT below for tips on using the calendar. 
  • Post regular brief updates (weekly at least) about what happens in class. 
Why? Students who miss class find it far easier to catch up if they can immediately look up what they missed. And you can also be sure that they got the correct information. As an added benefit, you will set a pattern for students to use the communication function on Schoology, and soon they will start using it on their own to answer each other's questions.
  • Organize your materials into logical, clearly-named folders (by unit, month or topic) that are easy for students to navigate. Be consistent and redundant in where you locate materials. 
Why? Students will often just give up if they can't find your materials quickly. So think about the logic that your students will use to search for materials rather than the logic that makes sense to you. And by creating redundancies--for example, attaching a file to the assignment it goes with as well as loading it into the unit folder--you make it more likely that your students will find what they need.
  • Either go as paperless as possible, or keep all class materials in hard copy. Try to avoid doing both.
Why? Students get confused about whether to look for handouts in their binders or on Schoology, and then get frustrated when they bring the wrong thing home. If you must use a hybrid approach, try to avoid hard copies for materials the students will need to use both at home and at school.
Picture
TIP--To make the PPT files below bigger, click on this icon at the bottom right corner of the PPT frame.

Tip #1: How to find and copy archived courses

Tip #2: Using the Schoology Calendar

Tip #3: Posting Regular Updates

Tip #4: Organizing Material Folders Logically

For more help on Schoology questions...

Go to the Schoology Help Center and search your topic.

Email Alyssa, Brette, or Mike.

Come talk to one of us in the Tech Center.
© Alyssa Tormala. All rights reserved.
  • Reflections
  • Presentations
  • About
  • For Families